
The Editor
You find a rule in the EPM Workbench sidebar and write it in a normal VS Code editor tab.
If you have not connected a Pod yet, start with Install and first Pod.
Find a rule
Section titled “Find a rule”-
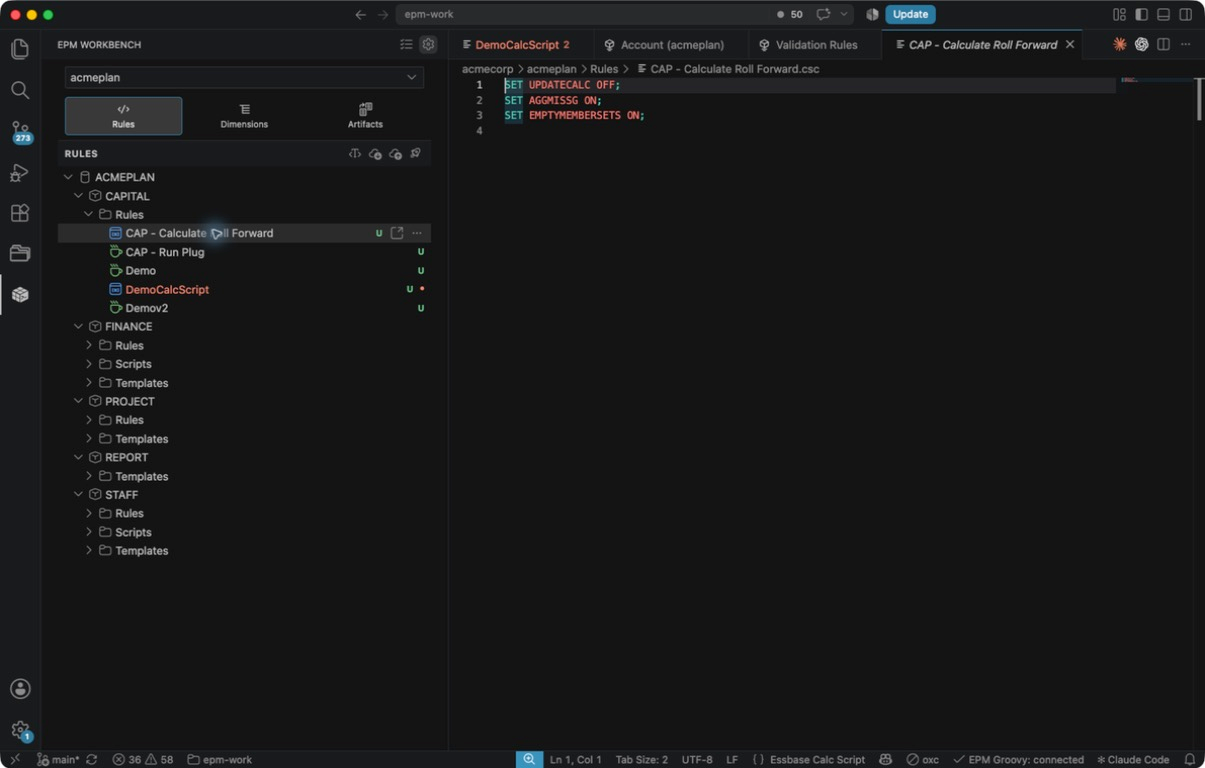
Click the EPM Workbench icon in the Activity Bar (the left-hand strip of icons).
-
Pick a Pod from the Select a Pod picker at the top of the sidebar. Pods are grouped by Domain, so a Domain with three Pods shows all three under one heading.
-
Choose a module tab. There are three: Rules, Dimensions, and Artifacts. Rules is where calculation work happens.
-
In Rules, expand the application, then a plan type, then one of the Rules, Scripts, or Templates folders. Subfolders appear inside them.
-
Click a rule to open it.
Hovering a row reveals its actions on the right:
- Open in New Tab on a rule, script, or template. A plain click opens the file in preview, so browsing several rules reuses one tab; this pins it instead.
- Add New on a folder, which creates a new rule, script, or template there.
- More Actions (the
…), which opens the full menu: Rename, Copy Rule, Add Validation Exception, the four EPM actions, and Delete. Right-clicking the row opens the same menu.
The editor tab
Section titled “The editor tab”A rule opens as an ordinary VS Code text document, not a custom view. That is deliberate: every editor feature you already use keeps working, including split editors, find and replace, multiple cursors, Local History, and AI assistants such as GitHub Copilot or Claude Code reading and writing the file directly.
What EPM Workbench adds while you type:
- Completion for members and aliases from your Pulled dimensions, calc functions,
Substitution Variables, Smart Lists, Connection names, and
%Template/%Scriptnames. - Errors and warnings from Validation Rules, shown inline and in the Problems panel.
- Hover documentation for functions and the EPM Groovy API.
- Formatting on save, which writes canonical spacing and casing every time you save so formatting noise never shows up as a difference against the Pod. Both formatters are configurable, and both can be turned off, in Settings.
Groovy rules get one more entry in the right-click menu: Show in API Docs, which opens the EPM Groovy API reference at the symbol under the cursor.
Sync badges
Section titled “Sync badges”Rule, script, and template rows carry a one-letter badge when your copy and the Pod’s copy have diverged.
| Badge | Meaning |
|---|---|
| A | Ahead. Your copy has changes Calculation Manager does not. |
| B | Behind. The Pod’s copy changed and yours did not. |
| ! | Drift. Both copies changed. Push, Deploy, and Execute stop and offer you a merge. |
| U | Untracked. The file has no sync record yet, so there is nothing to compare it against. |
A row with no badge matches the last state EPM Workbench recorded for that file. Your own edits change the badge as soon as you save. The Pod’s side is refreshed by a Pull and by the Drift Check that runs at the start of every Push, Deploy, and Execute, so B and ! can turn up on a rule you have not opened. Drift and Merging covers what each badge means in full and what to do about drift. Library Folders show no badges: a Library is not connected to a Pod, so there is nothing to compare against.
The buttons in the editor title bar
Section titled “The buttons in the editor title bar”With a rule from a live Pod open, four buttons appear at the top right of the editor tab:
| Button | What it does |
|---|---|
| Pull from EPM | Brings the Pod’s current copy of the rule down into your folder. |
| Push to EPM | Writes your saved copy back into Calculation Manager. |
| Deploy | Deploys the rule in EPM so the Planning application picks it up. |
| Execute | Pushes, deploys, runs the rule on the Pod, and brings back the log. |
EPM Sync and Runs covers all four in full, along with the Runs Panel that tracks them, and Drift and Merging covers what happens when somebody else changed the same rule in Calculation Manager.